20 Fun and Easy Fall Craft Ideas for Kids”
Last updated on December 17th, 2025 at 12:26 pm
If your kids are bouncing off the walls and the weather’s keeping everyone indoors, crafts are your secret weapon. And fall? Fall is a goldmine of inspiration—leaves, pumpkins, acorns, apples, cozy textures, and rich colors. There’s no shortage of materials or themes to work with.
But let’s be real: no one wants a craft that takes 27 steps and ends with glitter in your coffee. These 20 fall crafts are low-prep, high-fun, and actually doable with kids from toddlers to tweens. Plus, every craft comes with easy-to-follow instructions so you’re not left Googling halfway through.
Crafts with Leaves, Sticks, and Nature’s Best
Leaf Rubbing Art
What you need: Dry leaves, white paper, crayons (peeled)
Step-by-step:
Collect leaves with strong veins (maple, oak, etc.).
Place them vein-side up under a white sheet of paper.
Rub the side of a crayon over the paper to reveal the leaf’s shape and texture.
Repeat with different leaves and colors to make a full-page design.
Tip: Use fall-colored crayons like orange, gold, red, and brown for extra seasonal flair.
Leaf People
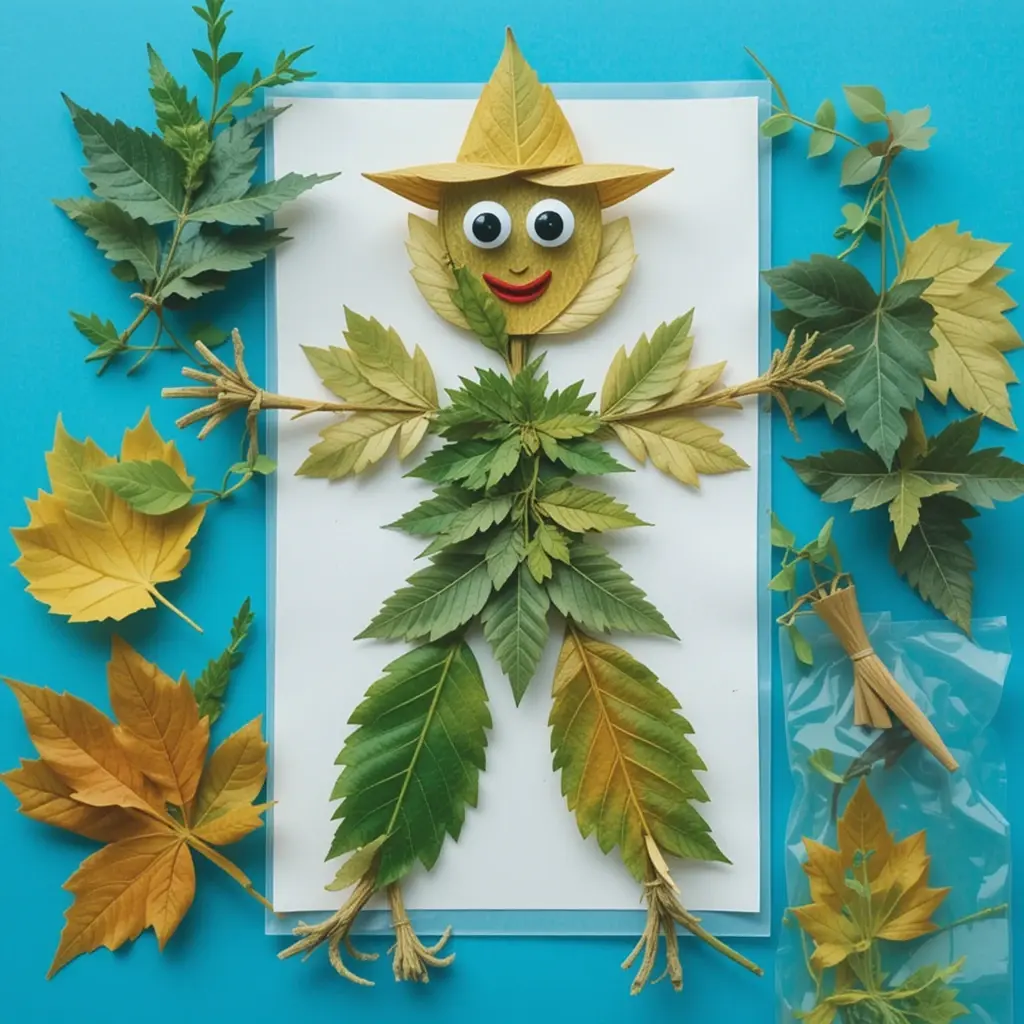
What you need: Leaves, glue, construction paper, googly eyes, markers
Step-by-step:
Glue various leaves onto paper to create the shape of a body, arms, and legs.
Add googly eyes and draw mouths, hats, or accessories with markers.
Name your leaf person and give them a story!
Why it works: Kids can use their imagination and no two “people” ever look alike.
Pinecone Owls

What you need: Pinecones, felt scraps, googly eyes, glue
Step-by-step:
Cut small felt triangles for beaks and larger pieces for wings.
Glue the wings onto the sides of the pinecone.
Attach googly eyes and the beak to the front.
Let it dry standing up—now it’s a wise little forest friend.
These are great on windowsills or bookshelves as seasonal decorations.
Twig Picture Frames
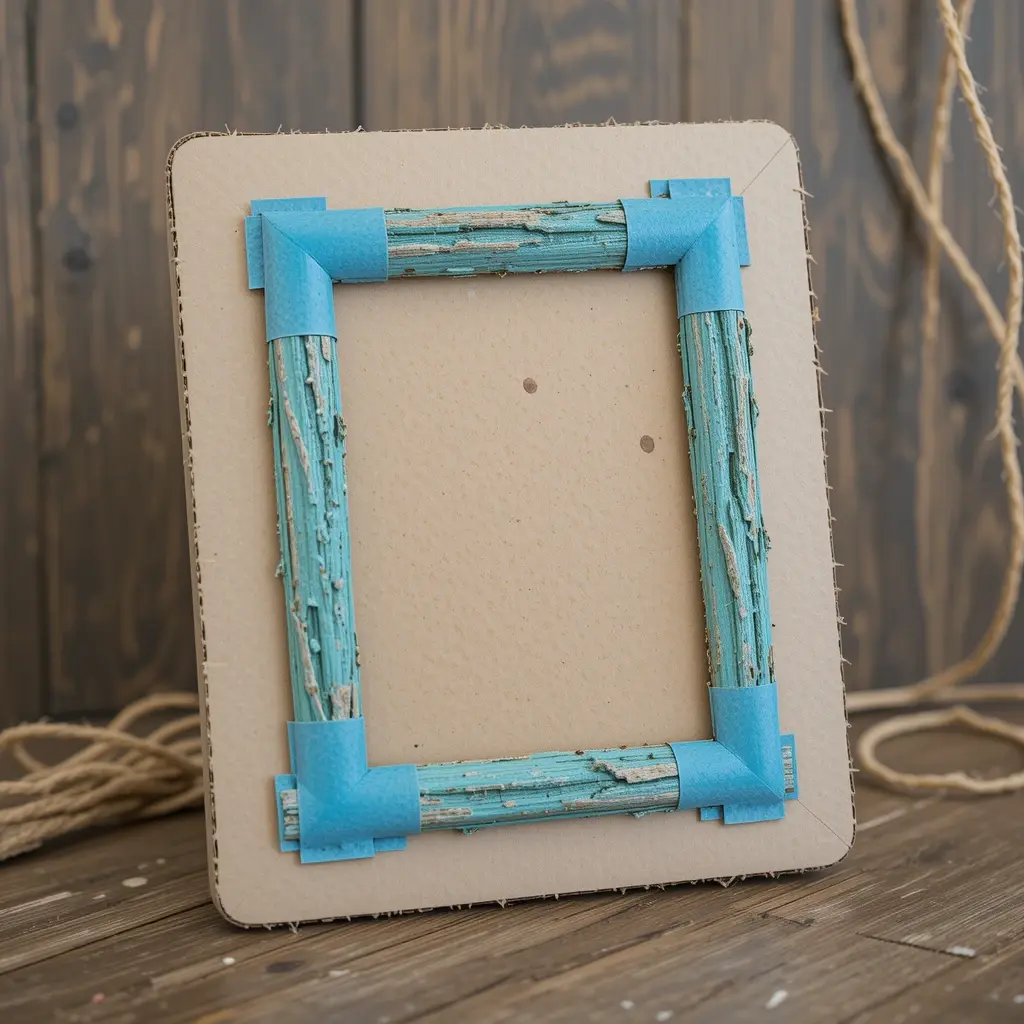
What you need: Sticks, cardboard, glue, twine (optional), paint (optional)
Step-by-step:
Cut a frame shape from cardboard.
Break twigs to size and glue them around the edges of the cardboard.
Paint the twigs or leave them natural.
Tape a photo or drawing on the back and prop it up or hang with twine.
Simple, rustic, and a great way to use up your backyard findings.
Acorn Cap Creatures
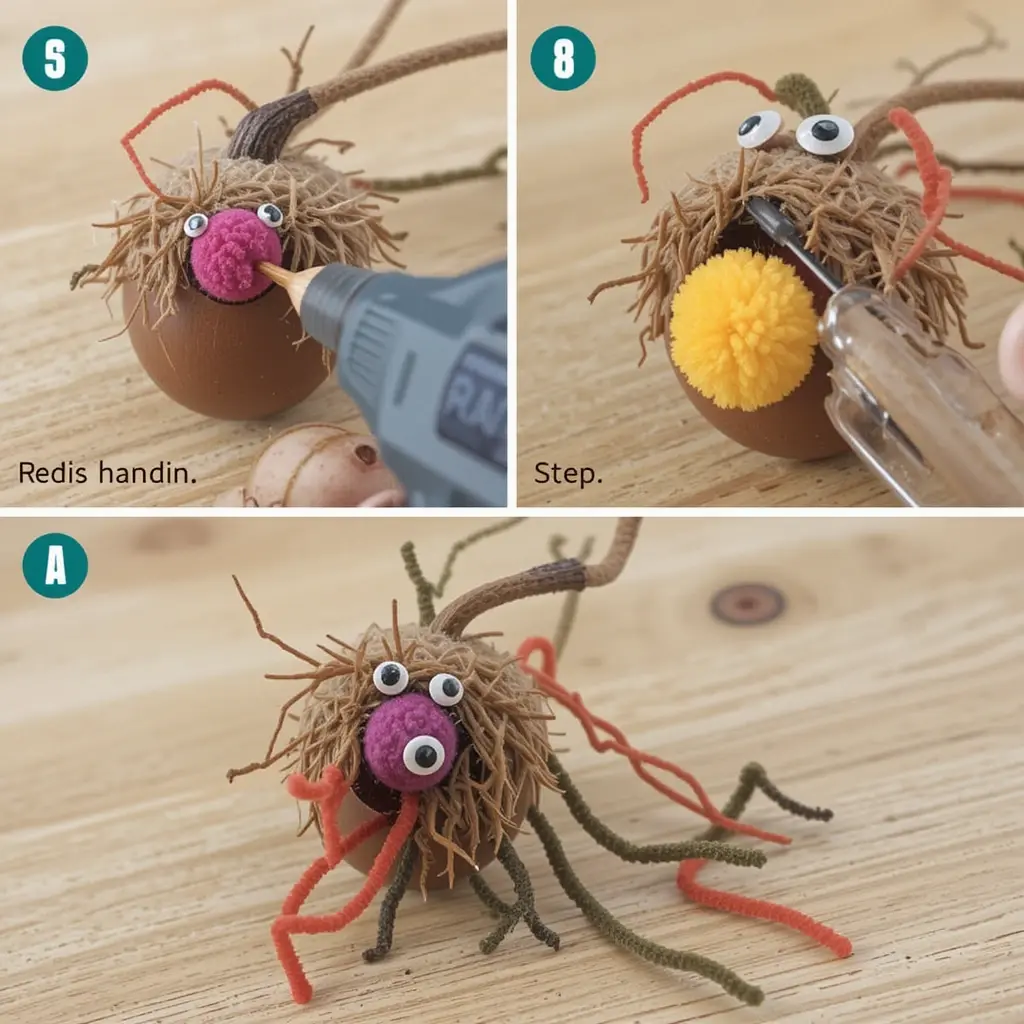
What you need: Acorn caps, pom poms, googly eyes, glue
Step-by-step:
Glue a pom pom inside each acorn cap.
Add googly eyes and tiny pipe cleaner legs if desired.
Let kids name and collect their “acorn pets.”
Small, adorable, and perfect for pretend play.
Paper Crafts That Keep Little Hands Busy

Torn Paper Fall Trees
What you need: Brown, orange, red, and yellow paper; glue; scissors
Step-by-step:
Tear colored paper into small pieces.
Draw or print a bare tree trunk onto a sheet of paper.
Glue the torn pieces around the branches as fall leaves.
Let dry and display on the fridge.
Great for preschoolers and early elementary kids working on fine motor skills.
Apple Stamps
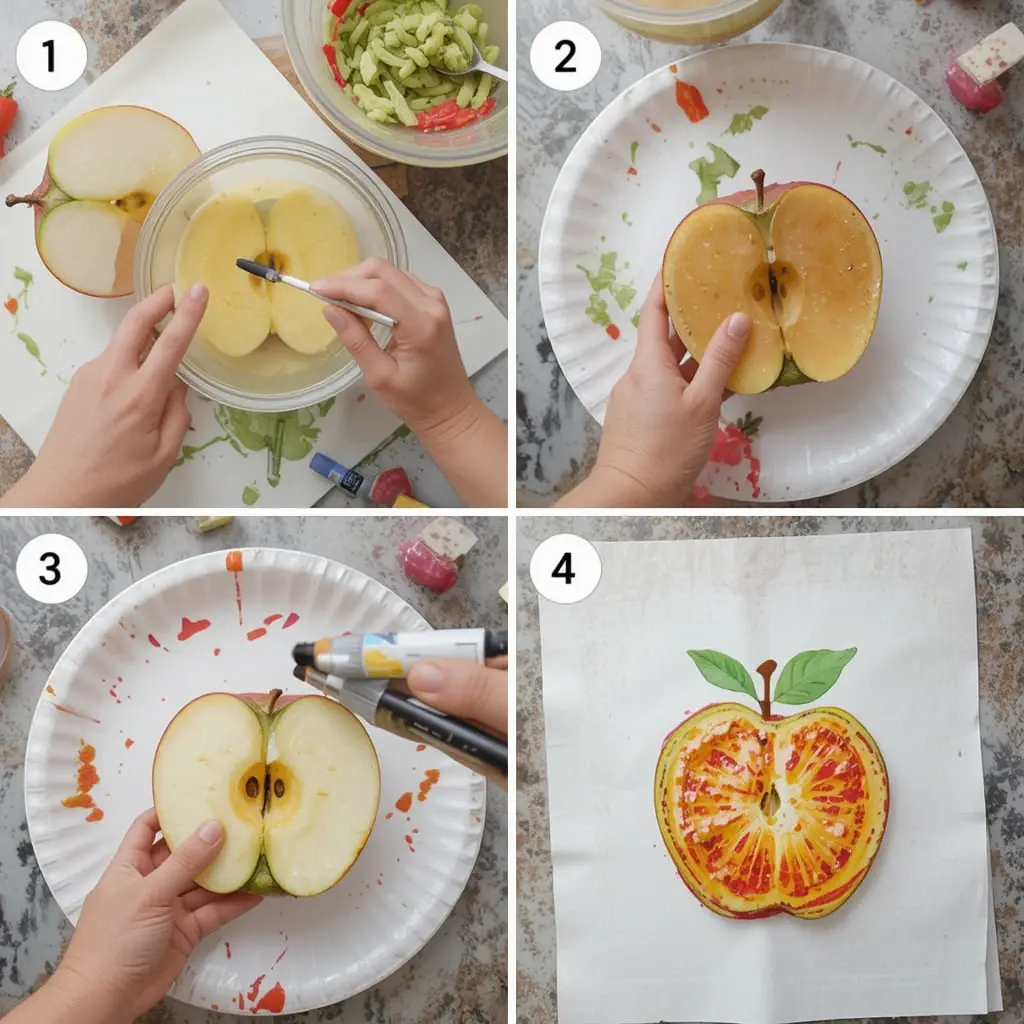
What you need: Apples, paint, paper plates, paper
Step-by-step:
Cut apples in half and blot the cut side dry.
Pour paint into a plate and dip the apple half in.
Press the apple onto paper to create a print.
Add stems or faces with markers once dry.
Pro tip: Use red, green, or even gold paint for realistic results.
Scarecrow Paper Plate Craft
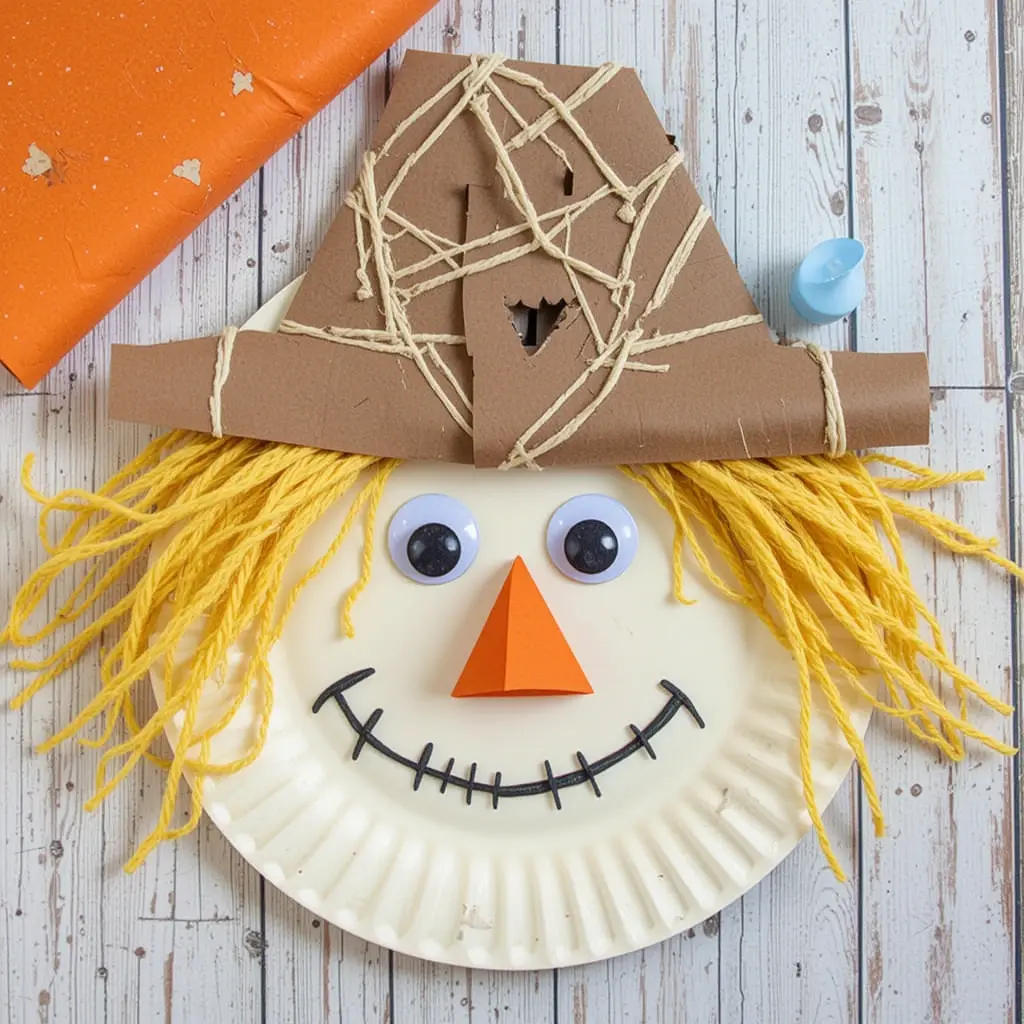
What you need: Paper plate, yarn, construction paper, glue, googly eyes
Step-by-step:
Use the paper plate as the face of the scarecrow.
Glue on yarn for hair and a paper triangle for the nose.
Cut and glue a construction paper hat to the top.
Add eyes and draw a stitched smile.
Perfect for Halloween or just as a fun seasonal craft.
Handprint Tree Art
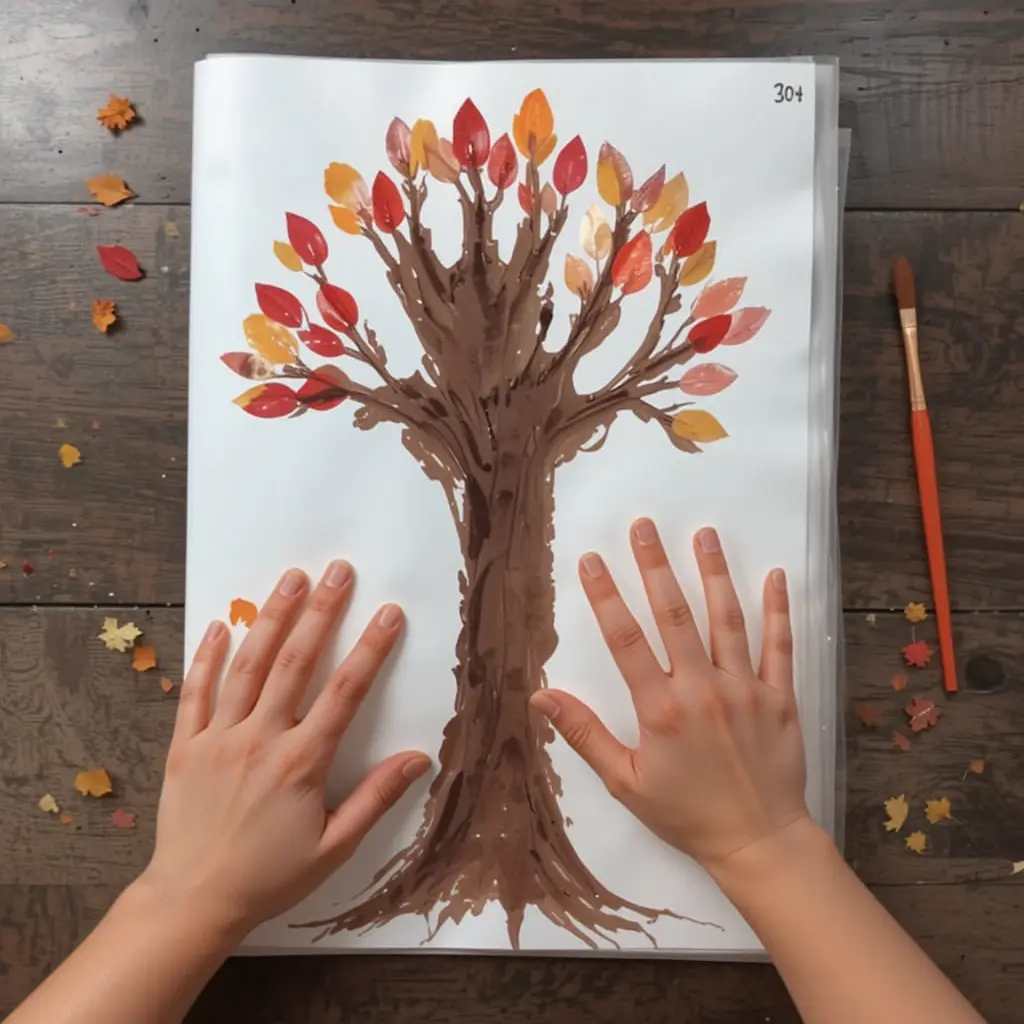
What you need: Paint, white paper, brushes
Step-by-step:
Paint your child’s arm and hand with brown paint.
Press it onto the paper to make a tree trunk and branches.
Use fingers dipped in red, orange, and yellow to stamp “leaves” around the branches.
Let dry and sign with your child’s name and the year.
Instant keepsake. Parents and grandparents love these.
Leaf Suncatchers

What you need: Contact paper, tissue paper, scissors
Step-by-step:
Cut a large leaf shape from the middle of construction paper to make a frame.
Stick contact paper to the back so the sticky side is exposed.
Let kids add small bits of colored tissue paper to fill the inside.
Seal with another piece of contact paper and hang in the window.
They look like stained glass when the sun hits.
Textured Crafts for Sensory Play
Coffee Filter Leaves
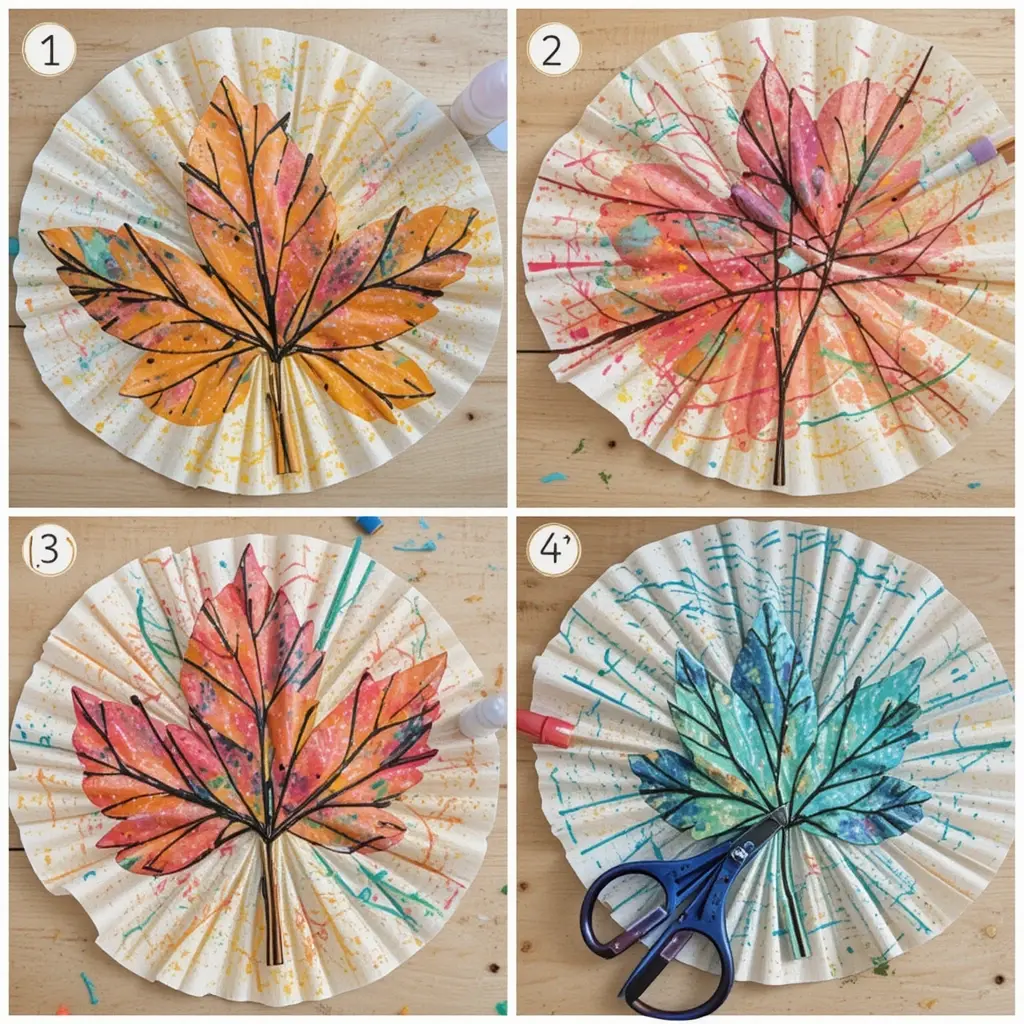
What you need: White coffee filters, markers, spray bottle, scissors
Step-by-step:
Flatten coffee filters and color them with fall-themed marker scribbles.
Lightly mist with water and watch the colors blend.
Once dry, cut out leaf shapes.
String together for a garland or stick in windows.
Kids love the color-mixing process, and cleanup is easy.
Pumpkin Spice Playdough
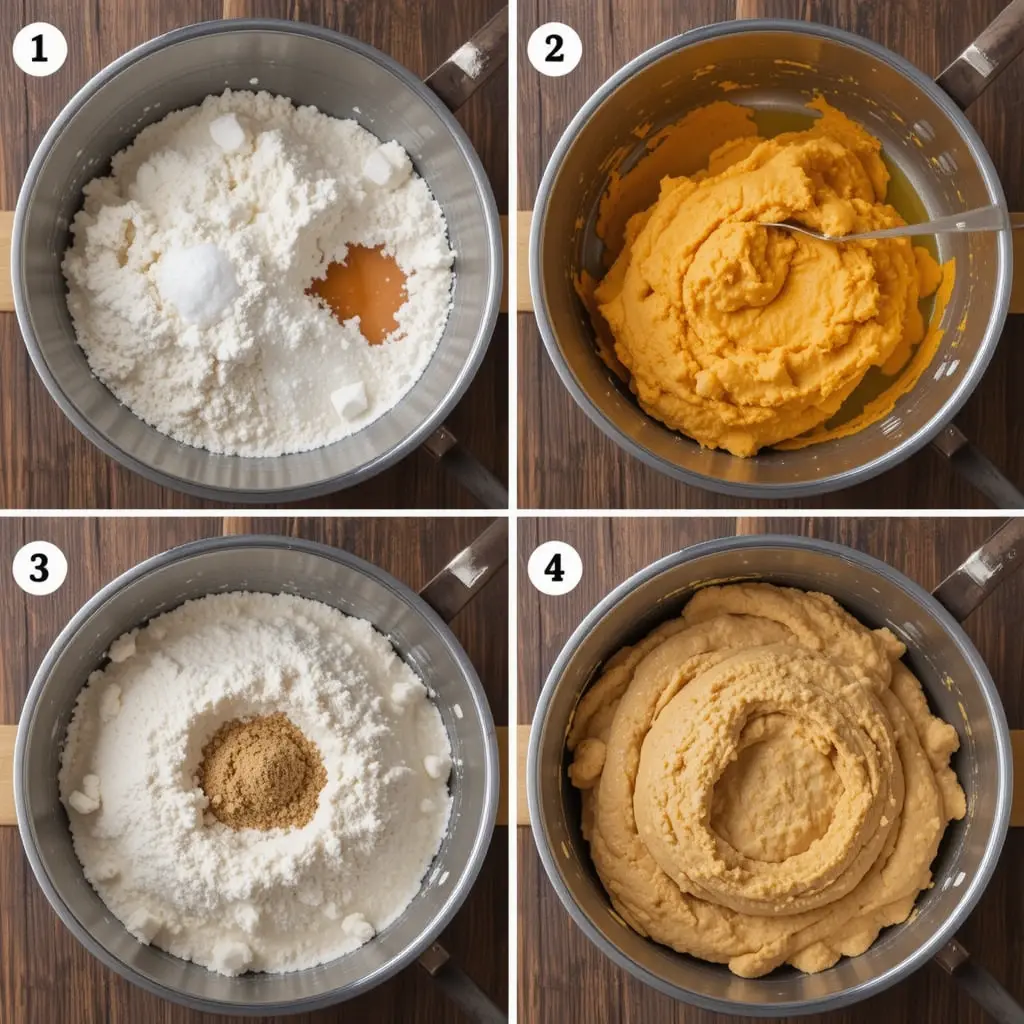
What you need: Flour, salt, cream of tartar, water, oil, food coloring, pumpkin pie spice
Step-by-step:
Mix 2 cups flour, 1 cup salt, 1 tbsp cream of tartar in a saucepan.
Add 1.5 cups water, 2 tbsp oil, orange food coloring, and 1 tbsp pumpkin spice.
Cook over medium heat until dough forms.
Cool and knead until smooth.
It smells like fall and lasts for weeks in a sealed container.
Sock Pumpkins
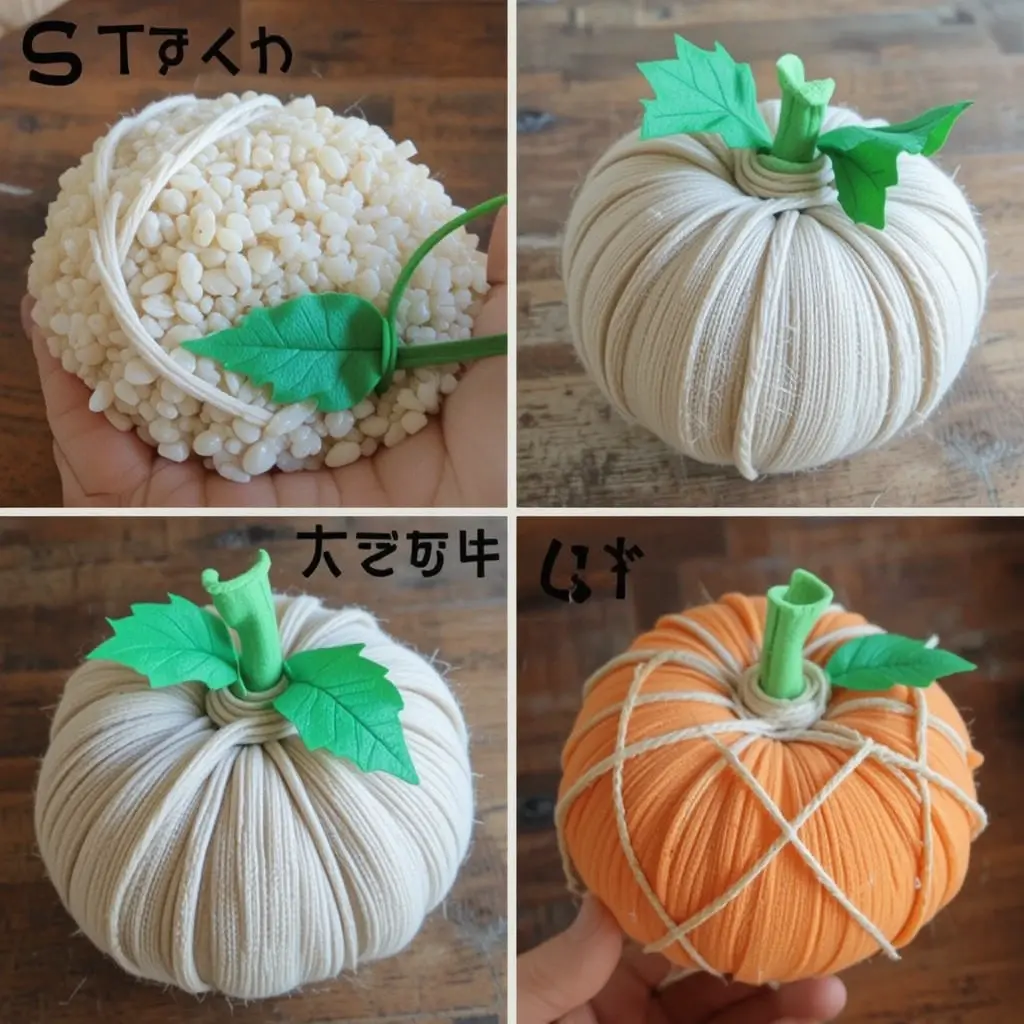
What you need: Old socks, rice or beans, string, green felt
Step-by-step:
Fill a sock with rice or beans until it’s plump.
Tie it off with a rubber band.
Wrap string around the pumpkin to form grooves.
Add a green felt stem and leaf on top.
Soft, squishy, and oddly satisfying to make.
Popcorn Kernel Art
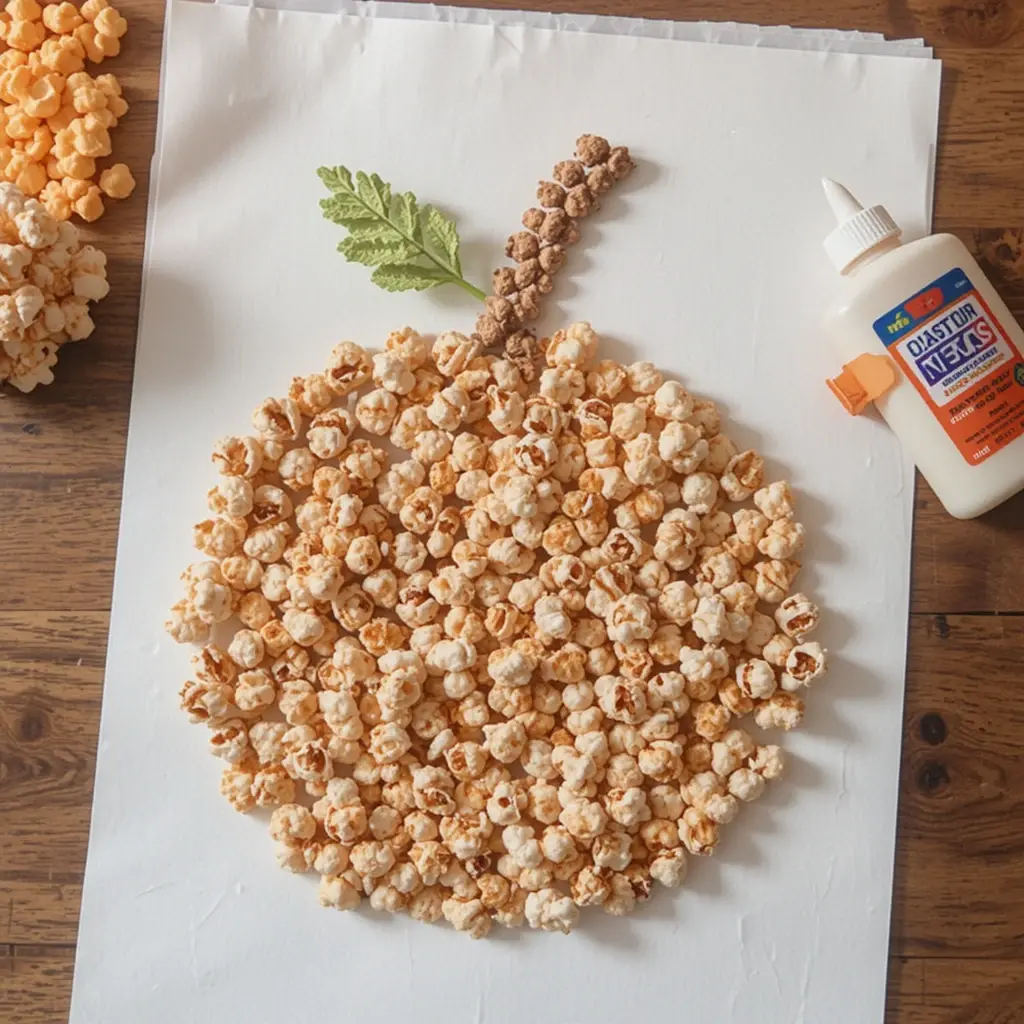
What you need: Paper, glue, unpopped popcorn kernels
Step-by-step:
Draw a shape (pumpkin, leaf, etc.) on paper.
Fill in areas with glue and sprinkle with kernels.
Let it dry flat to avoid pieces falling off.
Optional: Dye the kernels with food coloring first.
The texture is a fun change from flat paper crafts.
Holiday-Themed and Giftable Crafts
Cereal Box Turkeys
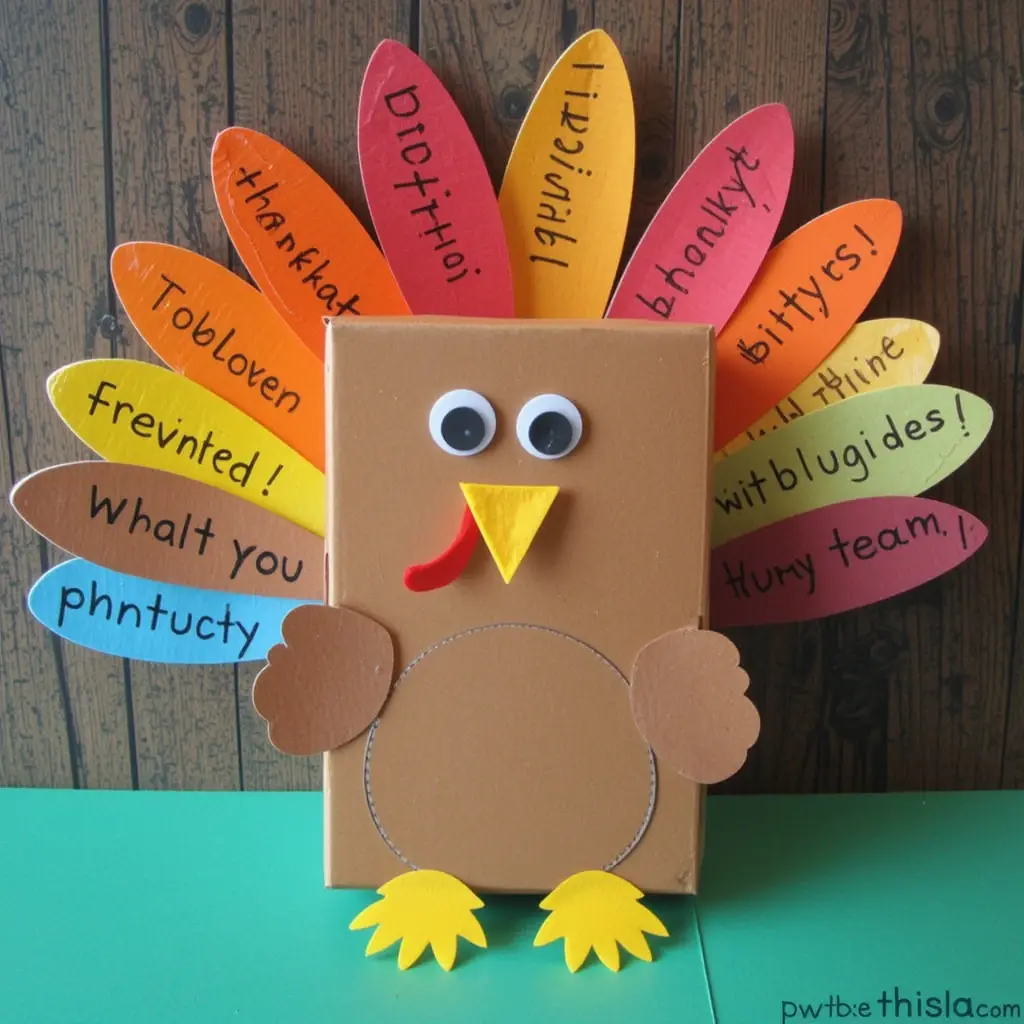
What you need: Cereal box, construction paper, googly eyes, glue
Step-by-step:
Cut out a turkey body from a cereal box.
Use colorful paper to make feathers and glue to the back.
Add a beak, wattle, and eyes.
Let kids write what they’re thankful for on the feathers.
Doubles as a Thanksgiving decoration and gratitude activity.
Felt Leaf Crowns
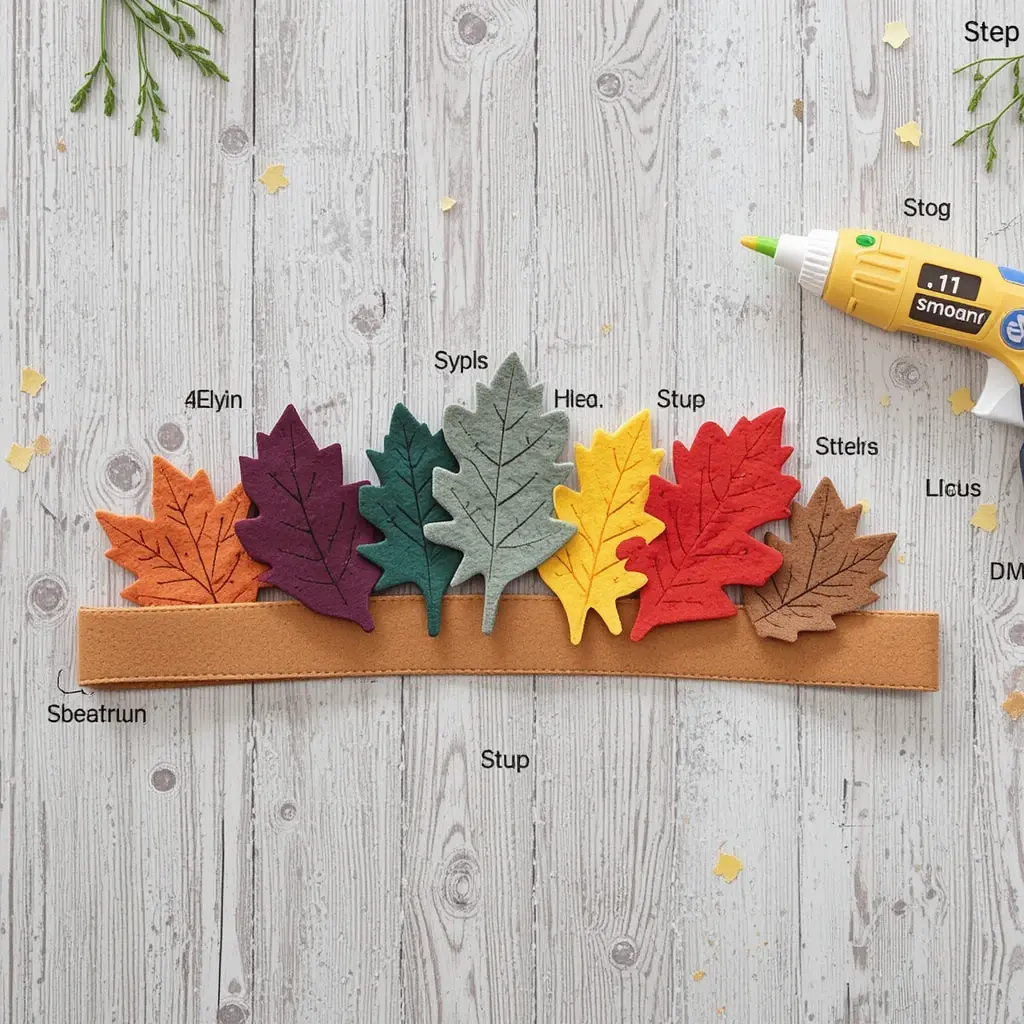
What you need: Felt, scissors, hot glue, elastic
Step-by-step:
Cut out leaf shapes from felt in various colors.
Glue them to a long strip of felt or ribbon.
Attach elastic at the ends to fit around your child’s head.
Let kids wear them while playing pretend or at a fall party.
Whimsical and easy to customize.
Gratitude Jars

What you need: Mason jar, paper, markers, string, stickers
Step-by-step:
Decorate the outside of a jar with stickers, ribbon, or twine.
Cut paper into strips and keep them nearby.
Each day, have your child write or draw one thing they’re thankful for.
Read them aloud at the end of the season.
A simple tradition that helps build reflection and gratitude.
Apple Slice Paint Brushes
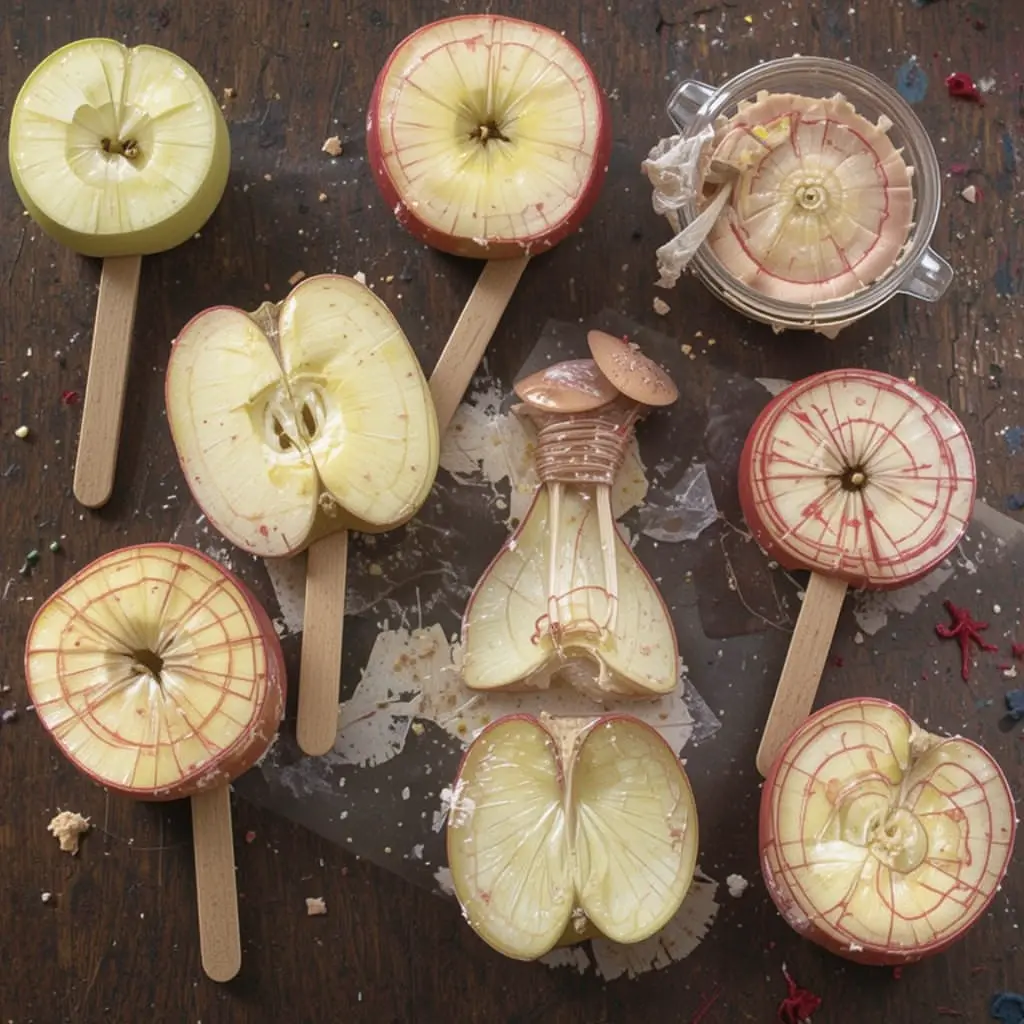
What you need: Apples, sticks or popsicle sticks, paint, paper
Step-by-step:
Cut apples into quarters and attach a stick to each for a handle.
Dip the cut side in paint.
Stamp onto paper to create patterns and designs.
Experiment with dragging or swirling the “brush” for effects.
Fun for toddlers who aren’t quite ready for real paintbrushes.
Quick Wrap-Up
You don’t need a craft closet that looks like a Pinterest board to make fall fun for kids. With just a few supplies and a little imagination, these easy projects can turn an ordinary afternoon into something creative and memorable.
So grab some leaves, clear the kitchen table, and let the mess begin. Fall won’t last forever—but these crafts (and the memories) will.